Showing posts with label Power Automate. Show all posts

Monday, March 23, 2020

Crash Course: HTTP to SharePoint in Power Automate

Today we are taking a crash course in the HTTP to SharePoint action in Power Automate.  There's a lot we could talk about to get you up to speed, but at the end of the day you just really need to know how to do the thing.  I've provided super quick explanations, but most importantly I've given you screenshots to use as a reference guide when getting started.
For a condensed, 30 minute overview in video format, check out my session from the Microsoft Power Platform Online Conference 2020!  Don't miss the bonus tips at the end!

HTTP GET

The GET method retrieves items from SharePoint and can be used with or without a specific ID.  Without an ID you'll return all items; with an ID, you'll return only that specific item.

GET All Items


GET Single Item


HTTP POST

The POST method sends data to SharePoint to create an item.  Send metadata to SharePoint using the Body section.  No need to supply values for all fields in the list; just create the item with required metadata.


HTTP PATCH

The PATCH method sends data to SharePoint to update an item.  This method is tricky, and there are a few extras you need to supply:

  • Specify the item to update by adding the ID to the end of your URI 
  • Add the IF-MATCH header with an asterisk (*) to represent an e-tag
As with the POST method, you don't need to supply values for all fields, just the ones you'd like to update.


HTTP DELETE

The DELETE method does exactly that!  Remember, this is permanent and deletion should only be done programmatically when necessary for a business process.

Don't test using production data! 


If you want additional explanations and some fun examples, here are links to the SharePoint & HTTP videos I've made with Jon Levesque:

Wednesday, November 13, 2019

Getting Started with Child flows in Power Automate


Child flows are new to Power Automate, and although the concept is simple, getting started is a little tricky.  I'll walk you through setting up parent/child flows within a solution and how to move data between the two.

Use a Solution

The first roadblock you might run into is that Child flows must be used inside Solutions.  What is a solution, you say? Well first, you'll find them on the left rail in Power Automate.  Second, solutions are a great way to package up one or more flows for deploying to a production environment.  This means that you don't have to export and import individual flows one at a time; instead, you export and import one solution package. (Want more?  Here's the Microsoft Walkthrough!)

To create a solution, click Solutions and then click + New solution.  Fill out the new solution form in the right rail and click Create.  

The flows

Your instinct might be to create the parent flow first, and that's fine if you have some logic you know you need to implement there first.  However, you cannot add the Run Child Flow action and save your flow without an existing child flow to point to.  For our purposes here let's create the child flow first.  Click the + New drop down in the top toolbar and select Flow.


The trigger for the child flow can be a manual button, but I prefer to use HTTP actions for my trigger and for my response.  I find this to be more flexible, and frankly, this is my comfort zone!  

Let's also add the Get items SharePoint action so that we have some data to send back to the parent flow.  I'm going to limit the count to the first item for the sake of simplicity.  

Now let's add the HTTP Response action as the last part of our child flow.  Here, set the Status Code to 200 to indicate a successful response.  In the Body of the response, add the Body from the previous Get items action.  This will serve the SharePoint items back to the parent flow, making them available for us to use.  Here's our simple child flow in its entirety: 


Make sure you rename your flow and save it.  Now let's work on the parent flow!  

Navigate back to the solution you created.  You may notice that multiple tabs open as you work on flows within a solution.  It's alright to close the extra tabs, but just know that your solution view will be updated with your changes after you save them and click the "done" button in the dialog that pops up.  

Add a new flow from the top toolbar as before.  I'm using a recurrence trigger here, but you can also use a manual trigger.  Add the Run a Child Flow action next, and choose your child flow from the drop-down.  You'll notice that the only choices available are flows within the current solution.  


We aren't finished, but this is a good spot to save the parent flow and do a test run.  What we want is the body of the response coming from the child flow because we are going to use that in a Parse JSON action next.  After your successful test run, go to the child flow inside your solution and click into the most recent run instance.  From there, copy the Body from the Response action.


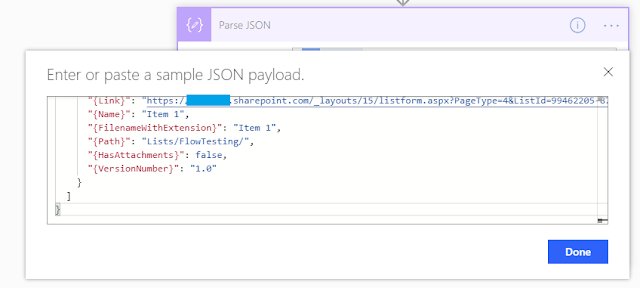
Navigate back to your parent flow.  Add the Parse JSON action, with the Content being the Body from the Run a Child Flow action.  Click on use a sample payload to generate schema and paste in the response body from the child flow:


Next, let's send an email with some of the information from the child flow.  Add the Office 365 Outlook Send an email action.  For the subject, search within the Dynamic content window for Title.  Add the Title column from the previous Parse JSON action.  Notice that Power Automate will add an Apply to each container for you since it does not know how many items have been returned from the response body, only what columns and data types are being returned.


Save your flow and run a test.  You should receive an email--or emails!-- based on the Get Items action buried in the child flow.  There are a lot of possibilities here, and I'm looking forward to seeing what interesting solutions are out there!


Photo by Sergey Pesterev on Unsplash

Sunday, October 20, 2019

Documents Sets with REST and Power Automate


With all the functionality available in Power Automate (Microsoft Flow) now, it's a wonder there is no native support for working directly with SharePoint Document Sets.  In this post, I review what Document Sets are, why you should be using them, and how to interact with them using REST and flows.

Update: This post has been updated to reflect best practices regarding the use of odata=nometadata in a production setting.

Why Document Sets?

Document Sets are a super-set of the folder content type in SharePoint.  They are a big part of Classic SharePoint and have recently been integrated into the modern experience in SharePoint and Office365.  Here's some of the functionality you get with Document Sets:

  • Metadata at the "Folder" level in Document Libraries
  • Unique Permissions at the Document Set level
  • Versioning the set, including the files inside 
  • Support for file templates

Your business users might already be using these, or they might be using folders and asking why metadata can't be placed on folders in libraries.  Document Sets are extremely useful for organizing content such as legal portfolios, customer documents, and contracts.

The Use Case

I set out to understand how to work with Document Sets and Power Automate when I received a request to create an approval and document repository solution for a client's legal department.  There was a clear need to store contracts inside Document Sets, but there was no desire to manually create and manage those Sets.

The Setup

For this solution I highly recommend setting up a site content type for your Document Set.  This will make it easier to work with and identify exactly which metadata will be included with your new Set.  If you need help getting started with content types, please review the Microsoft documentation.

You'll also need to decide how you are going to manage the request for Document Set creation.  I opted for a request list with an approval process.  

Once the request has been approved we can get to the good stuff!

GET the Content Type ID

The first thing we need to do is get the content type ID of the Document Set.  For this example I created a content type called Project, and I've already added it as an available content type in the Documents document library.  

In your flow, add the action HTTP to SharePoint.  Add in the site and set the Method to GET.  The Uri points to the content types in your library and filters them to find the one named Project.


Go ahead and run your flow.  Next, add a Parse JSON action and point to the body returned from the HTTP call above.  Copy the payload out of your test run and use that to generate the schema for your JSON.


Run your flow again and let's pause here to take a look at what information is coming back.  Remember, we are looking for the Content Type ID.  This is a great time to actually review the body of data returned from the HTTP GET action.  You'll see that the Content Type ID is found in a few places, but most obviously as the value for StringId.   

Initialize and set a string variable to hold the StringId.  It's nested in the body of the response, so you'll need to format your expression like this: 

first(body('Parse_JSON')?['value'])?['StringId']

POST to Create Document Set

Now let's work on the call that will actually create the Document Set.  Add another HTTP to SharePoint action, this time with a POST method.  Note that the Uri actually points to the SharePoint 2010 listdata.svc endpoint for our library.  


In addition to the expected accept application/json header, we need to add a Slug header.  Fun side note, "slug" refers to the working title of a newspaper article prior to going to print.  This use of Slug is clever because we are in fact merely suggesting what the Uri of the new Document Set will be; we are providing a working title for it.

Add in the rest of the header information formatted as above.  The first variable is the suggested title of the Document Set; the second variable is the Content Type ID we previously retrieved.

That is enough to get a new Document Set created in your library!  From here you can do many more interesting things depending on your needs, but that is for another post.


Photo by Jason Wong on Unsplash

Parallel Branches with flows in Power Automate

Parallel branches have been available in Power Automate (Microsoft Flow) for some time, but I hadn't had the opportunity yet to use them in a production build.  Let's do a super quick refresher today on how to use them.


The Use Case

I needed to implement three parallel approvals, as well as different actions that would occur after approval or rejection in each branch.  I also needed to gather the responses for one overall condition at the end.  This was part of a larger 3 stage serial approval process.

The Set Up

I suggest that you don't set up all of your approvals serially with the intent of moving them around into parallel branches.  If you have the opportunity to start fresh or you are starting from scratch that's the easiest to handle!

However, don't sweat it if you do have a flow you'd like to adjust.  We'll go over how to easily handle that at the end.

Let's do this!

First, create an approval as you would normally by adding the action wherever you need to in your flow.
Next, locate the + button above your approval to Insert a new step.  From here, select Add a parallel branch.


In branch that appears, add actions you'd like to run in parallel, such as another approval.  Go ahead and add any additional actions such as conditions and updating items.  If you want to get fancy and all a third parallel branch, be sure to click the Insert New Step button at the top of the branches and not directly above the actions in one of the branches.  This isn't extremely obvious at first.

When you're ready, let's bring the branches back together using the New Step button.  The branches automatically come together once you choose an action.  Remember, all the actions in each branch have to complete successfully before any actions outside the branches will execute.


Simple, easy, straightforward! As I mentioned, if you're reformatting an existing flow to make your serial approvals run in parallel you can't drag your existing steps next to each other to dynamically create a parallel branch.  However, you get around this by adding a branch and choosing a placeholder action such as Initialize Variable.  After you have that, just drag your approvals into the branch and delete your placeholder.


Photo by Karolien Brughmans on Unsplash